

In addition to being a professional painter I am an hobbist and a long time Warhammer Fantasy battle player and like all the WHFB gamers I love the idea of moving on the table big blocks of units and rolling buckets of dice. But painting for customers and companies is not different from any other type of job and that means just a few hours per week left to paint our beloved models. Add to it the standard life commitments like family gym and stuff and this amount of hours is drastically reduced. This leads to a world of grey armies, often played but never painted and my armies weren’t different. But with the return of Warhammer the Old World, I had one objective in mind: to find a way to paint my army in a quick and effective way, so I could play my favourite game finally with a completely painted army on a nice looking table ( that’s ironic, but I had 2 completely painted tables and no painted armies). That’s why I have spent some days testing and trying a new method that helped me and other hobbists (first of all the members of my gaming group) to play with painted armies, a technique that I first called “alternative slapchop” but now after some refinements I call “Spray and Dray”.
But first a bit of theory.
Regiment focus vs single model focus
Painting a rank and file unit needs a different approach rather than painting a single model or a small team of individual models. While individual models needs a 360° attention to details since we are going to look all around them while on table, ranked units of models should be treated as a single big entity rather than a group of single models. This leads to a different approach to painting, where we focus the care, attention and placement of lights and shadows based on the place the models occupy in the unit, rather than the classic zenital light approach:
-is the model in the middle of the unit? Let’s focus painting the top areas like head, shoulders and raised arms and weapons (Fig.1)
-is the model on one of the sides of the unit? We give extra care to either its left or right side . (Fig.1)
-is the model on the front? We will give him twice extra care since he is going to be the “face” of the unit, the prominent part of it that is going to be looked at first
With this approach we aim at optimizing the time and care spent on the entire unit, skipping some steps on areas that will be covered by the press of bodies, while taking extra care on the most exposed parts of the unit. We are going to save between 40 to 60% of time with this approach, meaning that we can paint more models in less time!
The Spray & Dray method
In addition to the theory I had to find the right technique to paint the army quickly, you don’t save too much time painting dozens of layers of thin colours even if you follow the theory above mentioned. After some research and tests I have opted for an alternative take on the slapchop method: it starts with a black primer followed by a white dryrbrush and then a wash, a quick method that often leaves a grainy finish on the model and a general cold tone, something not right on my orcs and goblins. So I choose to add a layer of a medium warm tone spray to the black instead, followed by a warm light tone drybrushed. This first change was then followed by another one after some tests: the layer of contrast/express colour wasn’t enough to remove the drybrush effect to some areas, so I have decided to add a tiny amount of standard colours on some mixes, that gave me the perfect balance between the contrast effect and the smooth one that you achieve with standard layering.
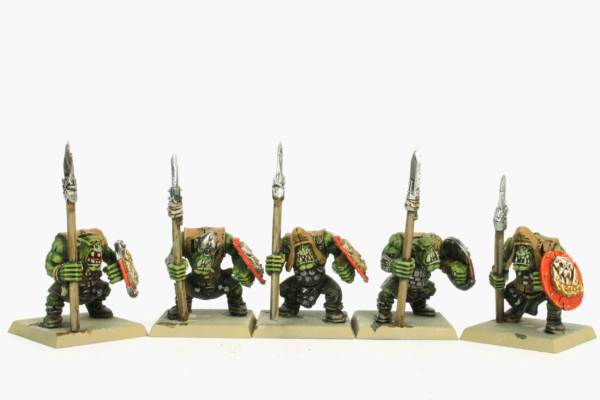
Let’s see now in detail the steps used on the orc unit:
Step 1: Spray
I start with a black primer sprayed all over the model, this will be the base for the shadows and you can use whatever brand you like, GW, Titan, Vallejo, they are all good for this purpose.
Then I spray the Zandri Dust from GW (Dunkelgelb spray Titan is a good alternative) at 45° all around the model. In this way we have a medium warm tone on all the most exposed areas while we save the dark shadows from the black in the recesses


Step 2: Dray
With the help of a cheap round make up brush (you can find it on Amazon) I apply the AMMO MIG Dio Drybrush colour Light Sand, a very light warm beige colour with the drybrush technique. This is a simple step, we just have to pay attention to the fact the we have to gently apply the color rather than stomping it on the model, otherwise we are going to cover entire surfaces in thick dusty color rather than highlighting just the most exposed parts.

Step 3: Washes
After several tries I found the perfect mix for my orcs skin: I wanted something different from the old school cartoony goblin green, so I went for a more olive drab tone. I achieved it mixing in 1:1 ratio the Vallejo Xpress Orc Skin and Xpress Plague Green. The we add 1 drop of GW Castellan Green every 3 drops of the mix (so a 1:3 ratio): in this way we obtain the perfect orc skin colour, that has a bit extra coverage over the drybrushed base and the same principles of the Xpress colour (perfect flow and transparency)
We apply also the Xpress Plasma Red on red parts, Xpress Hospitaller Black on boots and straps, Xpress Battledress Brown on clothing and straps and finally, Xpress Copper Brown on wooden elements.

Step 4: details
We now paint the finer details like teeth, nails, eyes, mouth and small straps and gold elements: these add lots of interest to the unit and make it “alive”, thanks to the contrast with the main areas painted until now. With just one step we transform the unit. We use mainly GW “base” paints in this step due to their strong coverage power, allowing us to achieve the desired effect in one step. We paint nails and teeth with GW Rakhart Flesh, eyes and tongues in Mephiston Red, Retributor Armour on gold and a 1:1 mix of GW Castellan Green and Cadian Fleshtone on mouths

Step 5:extra care of the details
From this point onwards we apply the paintjob only on the front of the unit and maybe on the sides, depending on how much time you want to spend on it (the main block of the army made of black orcs or swordmasters deserve extra love, one of the many skaven slaves maybe not!)
Also even when it comes with the front models of the unit we have to avoid falling into the trap of painting the back of these models with the same care as the front, since 9 times out of 10 that part is going to be obscured by the other ranks! If you can see the back of the front rank models, something is very wrong and you will not see these models on the table for long.
We start from teeth, nails and some straps: we apply a 1:1 mix of GW Rakhart Flesh and GW Flayed One Flesh followed by an edge highlight of pure GW Flayed One Flesh.
We then apply a dot of GW Fiery Orange on the eyes to make them pop.
We finish off the details adding a layer of 1:1 GW balor brown and Scale75 Brown Leather on the leather tunic and trousers followed by an edge highlight of previous mix plus one part of GW Flayed One Flesh

Front of the unit
The next steps will be used just on the front of the unit, the “face” of the unit itself!
Layering 1
We now go back to the main feature of the unit: the skin! We already have a good amount of lights and shadows thanks to the xpress colours so it’s just a matter of pushing the lights a bit adding details to the faces of the models, the focal point of the front rank. We paint the first Highlight adding 1 part of GW Elysian Green to orc skin mix of step 3 (Vallejo Xpress Orc Skin, Xpress Plague Green and GW Castellan Green in equal parts)
We also add one part of GW Flayed One Flesh to the 1:1 mix of GW Castellan Green and Cadian Fleshtone on mouths
Layering 2
We now complete skin adding one part of GW Ogryn camo and Flayed One Flesh to the skin mix of Step 6 focusing on the most exposed areas like top of musclesn knucles and cheeckbones.
We then move on the faces adding a wash with GW Carroburg Crimson on mouths, noses and around the eyes in order to give a bit of life to the faces and we then complete them painting some highlights with pure GW Flayed One Flesh on the most exposed areas.
Refining
In this step we use a 1:1 mix of GW Rhinox Hide and GW Castellan Green to paint recesses between skin and other elements like tunics or straps in order to correct errors and we paint also recesses between muscles to increase definition. With this step we have completed the unit!

Final Thoughts
As you can see from this tutorial this is more of an approach of painting units and armies, using several techniques adapted and tuned in order to work as an organic method with the aim of saving time and focusing quality where needed. Also as you have noted I left intentionally out of the tutorial the metallic parts, because they will be covered in a further tutorial focused on painting heavily armoured units.
Hope you enjoyed this article, please subscribe to the newsletter in order to get notified when I upload the next ones! SUBSCRIBE HERE


Great tutorial and great results ! You make it seem easy to paint armies now.
Glad it helps!
Thanks for taking the time to make this tutorial!
Thank you!